If you spend eight or more hours a day sitting at a desk, your body is paying a price you may not fully recognize yet. Chronic back pain, neck stiffness, shoulder tension, poor circulation, and afternoon energy crashes are among the most common consequences of prolonged sitting — and they are overwhelmingly the result of poor desk ergonomics rather than simply the act of sitting itself.
A riser desk — also known as a standing desk riser, desk converter, or sit-stand converter — is one of the most practical, affordable, and effective tools available for addressing these problems. It sits on top of your existing desk, elevates your monitor and keyboard to ergonomically correct heights, and gives you the flexibility to alternate between sitting and standing throughout your workday without purchasing an entirely new desk.
But buying a riser desk and placing it on your desk is only the beginning. Using it correctly — with precise height calibration, proper posture habits, and a sensible standing schedule — is what determines whether you experience genuine, lasting improvements in comfort and productivity or simply trade one set of problems for another. This guide walks you through every step of setting up and using your riser desk the right way.
What Is a Riser Desk?
A riser desk is an accessory that sits on top of a standard desk surface and raises your workstation equipment to a height suitable for standing use. Most riser desks feature either a single-tier platform that raises everything together or a dual-tier design with a higher shelf for your monitor and a lower tray specifically for your keyboard and mouse.
The adjustment mechanism varies by model. Gas spring risers use spring-loaded lift handles that allow you to raise or lower the platform with a gentle squeeze and lift. Crank-operated models use a manual handle to wind the platform up or down. Electric motorized risers use button controls for smooth, precise height adjustment at the touch of a button.
Riser desks are particularly popular because they offer most of the ergonomic benefits of a full standing desk at a fraction of the cost and without requiring you to replace your existing furniture. They are also portable and easy to reconfigure, making them an excellent solution for home offices, shared workspaces, and corporate environments alike.
Why Using a Riser Desk Correctly Matters
Many people purchase a riser desk with excellent intentions and then fail to realize its full potential because they set it up incorrectly or use it without understanding the ergonomic principles behind it. A riser desk configured at the wrong height — or used without adjusting the surrounding chair and monitor position — can actually create new sources of strain rather than eliminating existing ones.
The human body has very specific tolerances for comfortable, sustainable working postures. Even small deviations from correct ergonomic alignment — a monitor two inches too low, a keyboard tray slightly too high, a standing duration slightly too long — accumulate into significant discomfort over an eight-hour workday. Understanding and applying the correct setup principles from the start saves you weeks of trial and error and ensures you experience the genuine benefits this equipment can provide.
Step 1: Calculate Your Correct Ergonomic Height
Before you adjust your riser to any position, you need to establish the correct ergonomic desk height for your specific body — both for sitting and standing. This is the most important step in the entire setup process and the one most people skip.
Finding Your Seated Desk Height
Sit in your office chair with your feet flat on the floor and your thighs approximately parallel to the ground. Allow your arms to hang naturally at your sides, then bend your elbows to a 90-degree angle as if you are about to type. The distance from the floor to your forearms at this position is your ideal seated desk height.
For most adults this falls somewhere between 23 and 29 inches, but it varies considerably based on individual height, leg length, and chair configuration. Standard office desks are typically set between 28 and 30 inches — a height optimized for people between approximately 5 feet 8 inches and 5 feet 10 inches tall. If you fall outside this range, a standard desk height is already creating ergonomic compromise, and your riser setup should correct for this from the outset.
Finding Your Standing Desk Height
Stand in a relaxed, upright posture with your shoulders back and your arms hanging naturally. Bend your elbows to a 90-degree angle. The height of your forearms from the floor is your ideal standing keyboard height. For most adults this falls between 40 and 44 inches, again with significant individual variation.
Calculating the Height Your Riser Needs to Add
Measure the height of your existing desk from the floor to the surface. Subtract this measurement from your ideal standing height. The resulting number is the minimum lift your riser needs to provide for a correct standing position. Verify that the riser you own or are considering purchasing can reach this height within its adjustment range.
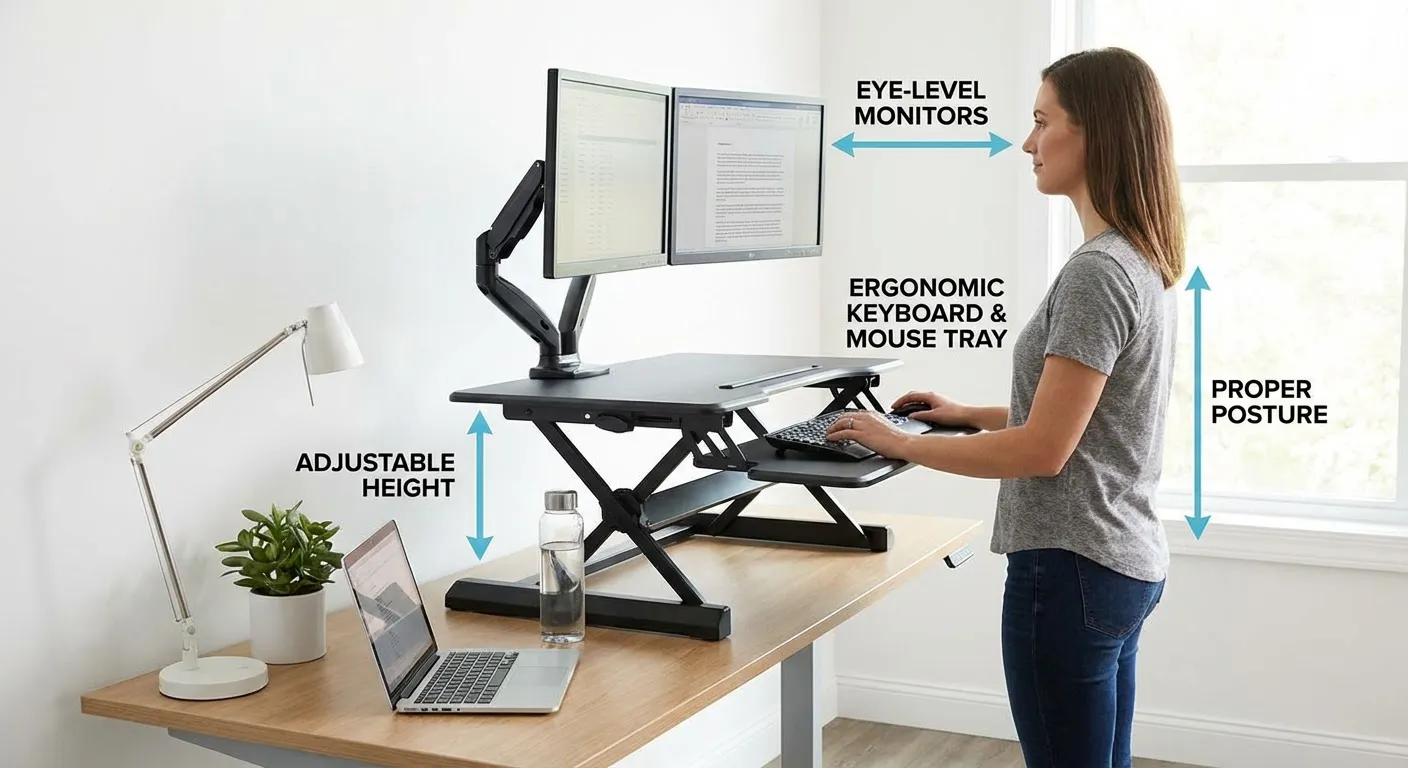
Step 2: Set Up Your Monitor at Eye Level
Monitor height is the ergonomic variable that has the greatest impact on neck and upper spine health, and it is the one most consistently misconfigured in real-world desk setups. The goal is to position your monitor so that your eyes naturally land on the upper third of the screen when you are sitting or standing in a relaxed, neutral posture — without tilting your head up or down.
When your monitor is too low — which is the most common problem — you spend the entire day looking slightly downward, which places sustained load on the muscles and joints of the neck and upper back. Over hours and years, this contributes significantly to the chronic neck pain and headaches that many desk workers accept as inevitable features of their work life rather than correctable ergonomic problems.
Place your monitor on the upper shelf of your riser desk and adjust the platform height so the top edge of the screen is approximately at or just below your eye level when you are in your normal working posture. Your monitor should also be positioned approximately an arm’s length away from your face — roughly 20 to 28 inches — and tilted very slightly backward, around 10 to 20 degrees, to reduce glare and maintain a comfortable viewing angle.
When you transition from sitting to standing, your eye level rises significantly — typically 10 to 12 inches for most adults. Your riser needs to move up by a corresponding amount to keep the monitor at the correct eye level in both positions. If your riser does not provide enough lift to achieve proper monitor height in the standing position, a separate monitor arm or additional monitor stand can supplement the riser’s range.
Step 3: Position Your Keyboard and Mouse
With your monitor correctly positioned, the next priority is your keyboard and mouse placement. These determine the health of your wrists, forearms, shoulders, and upper back throughout the workday.
Your keyboard should sit at the height established in Step 1 — the height at which your elbows are bent at 90 degrees and your forearms are approximately parallel to the floor when your fingers rest on the home row keys. Your wrists should be in a neutral position, neither bent upward nor downward during typing. If your wrists naturally drop below the keyboard or rise above it during typing, the keyboard height needs adjustment.
Your mouse should sit on the same surface as your keyboard, positioned as close to the keyboard as practical so you can reach it without extending your arm or rotating your shoulder outward. A mouse that requires you to reach forward or to the side repeatedly throughout the day is a significant contributor to shoulder and upper arm fatigue.
If your riser includes a dual-tier design with a separate keyboard tray below the monitor shelf, this configuration is specifically designed to solve one of the most common ergonomic problems with single-surface risers: the conflict between correct monitor height and correct keyboard height. A single-platform riser forces a compromise between these two variables. A dual-tier design allows each to be optimized independently, which is worth prioritizing when selecting a riser if you have not yet purchased one.
Step 4: Adjust Your Chair to Complement the Riser
Your chair is not independent of your riser desk setup — it is an integral part of the same ergonomic system, and misconfiguring your chair will undermine even a perfectly calibrated riser.
With your riser set to your seated working height, adjust your chair so your feet rest flat on the floor and your thighs are parallel to the ground. Your lower back should be supported by the lumbar support of your chair, maintaining the natural inward curve of your lumbar spine rather than allowing it to round outward. Your shoulders should be relaxed — not elevated toward your ears or rolled forward — and your head should sit naturally above your shoulders without jutting forward.
If adjusting your chair height to achieve the correct arm position causes your feet to lift off the floor, add a footrest to restore proper foot support. Dangling feet restrict circulation in the legs and contribute to fatigue and discomfort over long sitting periods.
If your chair has armrests, position them so your arms can rest gently on them with your elbows close to your body and your shoulders completely relaxed. Armrests set too high force your shoulders upward into a shrugged position all day. Armrests set too low provide no support and encourage you to lean to one side to reach them. When in doubt, removing or fully lowering the armrests is preferable to using them at the wrong height.
Step 5: Use the Adjustment Mechanism Correctly
Operating your riser desk’s adjustment mechanism properly ensures smooth, safe transitions and extends the working life of the equipment.
For gas spring models, grip both release handles simultaneously and lift the platform smoothly and evenly. Once the platform reaches your desired height, release both handles at the same time to lock it in position. Avoid releasing one handle before the other, as this creates uneven load on the mechanism and can cause the platform to tilt or bind. Never force the platform beyond the natural range of its spring mechanism, and avoid dropping the platform quickly without controlled descent.
For electric motorized models, use the control panel or memory buttons to move the platform to your preset heights. Most electric risers allow you to save two to four height presets — program one for your seated height and one for your standing height so transitions between positions are instantaneous and require no manual adjustment or measurement.
For crank-operated models, turn the handle steadily and evenly, pausing periodically to verify the height before continuing. Crank models require more time and physical effort to adjust than gas spring or electric alternatives, which makes them less likely to encourage frequent sitting-to-standing transitions throughout the day.
Step 6: Establish a Sitting and Standing Routine
One of the most important and most underappreciated aspects of using a riser desk effectively is building a sustainable routine for alternating between sitting and standing. The health benefits of a riser desk come not from standing itself but from the regular movement and postural variation that alternating between positions creates.
Many people make the mistake of standing for as long as possible when they first get a riser desk, treating extended standing as the goal. This approach almost always backfires. Standing for prolonged periods without movement causes its own form of fatigue and discomfort — in the feet, calves, lower back, and knees — and frequently leads people to abandon the standing position entirely after a few uncomfortable days.
Research on sit-stand workstation use consistently supports a ratio of one hour of standing for every one to two hours of sitting as an effective and sustainable target. If you are new to standing desk use, begin with 20 to 30 minutes of standing per hour in your first week and build gradually from there as your body adapts. Use a timer or a calendar reminder to prompt position changes if you tend to become absorbed in work and forget to alternate.
Pay attention to the types of tasks you perform in each position. Many people find that standing works well for tasks that require energy and engagement — calls, emails, active reading, collaborative work — while sitting is more comfortable for tasks that require extended concentration, detailed writing, or complex problem-solving. Aligning your position changes with natural task transitions makes the habit easier to maintain and often improves your engagement with both types of work.
Step 7: Add Ergonomic Accessories
A riser desk works best as part of a complete ergonomic workstation rather than as a standalone solution. Several accessories can significantly enhance your comfort and the health benefits you experience.
An anti-fatigue mat is the single most impactful accessory for standing desk users. Standing on a hard floor causes fatigue in the feet, calves, and lower back that limits how long you can comfortably remain in the standing position. A quality anti-fatigue mat provides cushioning and encourages subtle micro-movements in the feet and legs that dramatically reduce this fatigue and extend comfortable standing duration.
A monitor arm provides greater flexibility in monitor positioning than a fixed riser shelf, allowing precise adjustment of screen height, depth, and angle independently of the riser platform height. If you use multiple monitors, a dual monitor arm makes it practical to maintain correct eye-level positioning for both screens simultaneously.
A document holder positioned adjacent to your monitor at the same height and distance reduces the neck rotation and repeated head movement that occur when you alternate between reading physical documents and looking at your screen — a common source of neck strain in data-entry and transcription-heavy roles.
A headset or speakerphone eliminates the temptation to cradle your phone between your ear and shoulder during calls — a posture that causes significant neck strain regardless of whether you are sitting or standing.
Step 8: Fine-Tune Your Setup Over Time
Your initial setup is a starting point, not a finished product. Your body will provide clear feedback over the first few weeks of riser desk use that should guide ongoing adjustments to your configuration.
Neck tension or headaches after screen time typically indicate that your monitor is positioned too low, too close, or at an angle that requires sustained awkward viewing. Wrist discomfort during or after typing suggests your keyboard height or angle needs adjustment. Lower back pain while standing may indicate you are standing for too long, your standing posture is collapsing, or you need an anti-fatigue mat. Shoulder fatigue or tension usually points to a mouse that is too far from your body, armrests at incorrect height, or a keyboard that is positioned too high.
Make adjustments in small increments — moving your monitor up or down by an inch at a time, adjusting keyboard height by half an inch — and give each adjustment several days of use before evaluating its effect. Ergonomic improvements are rarely dramatic and immediate. They reveal themselves gradually through reduced discomfort and improved energy over sustained use.
Common Riser Desk Mistakes to Avoid
Setting the monitor too low is the most prevalent mistake and the one with the greatest impact on neck and upper spine health. Always verify monitor height against your actual eye level rather than estimating by appearance.
Standing without an anti-fatigue mat on hard flooring significantly accelerates standing fatigue and increases discomfort in the feet and lower legs, making it much harder to maintain a consistent standing routine.
Overloading the riser beyond its rated weight capacity creates instability during use and risks damaging the adjustment mechanism. Check the weight of all equipment you plan to place on the riser — monitors, laptop, speakers, accessories — and ensure the total falls comfortably within the manufacturer’s specified limit.
Failing to adjust the chair when changing the riser height means your body position changes but your support system does not, creating misalignment between your seated posture and your workstation configuration.
Neglecting cable management allows cables to create tension or resistance when the riser moves between heights, which can pull equipment, restrict the riser’s range of motion, and create tripping hazards at the standing position.
Troubleshooting Common Riser Desk Problems
If your riser wobbles or feels unstable, check that all fasteners are fully tightened, verify that the desk surface it sits on is level, and confirm that the load on the platform is within the rated weight capacity. Platforms that are significantly underloaded can sometimes feel less stable than those loaded closer to the rated capacity due to the calibration of the spring mechanism.
If a gas spring mechanism feels stiff or difficult to adjust, verify that the total weight on the platform falls within the rated range for that specific model. Gas spring risers are calibrated for a particular weight window — too little load can make them feel resistant to downward movement, while too much load can make them difficult to lift.
If your monitor is at the correct height when seated but too low when standing, you need either a riser with a greater vertical travel range, a monitor arm that can extend higher than the riser shelf, or a riser that allows the monitor shelf to be adjusted independently of the keyboard tray height.
If you experience glare on your monitor in the standing position that was not present when seated, your changed eye angle relative to windows and overhead lighting is the cause. Adjust the tilt of your monitor to redirect the glare, reposition the riser on the desk to change your angle relative to the light source, or add window blinds or a monitor hood to reduce the ambient light causing the reflection.
Frequently Asked Questions
How high should a riser desk be for standing? Your riser desk standing height should position your keyboard at the height where your elbows are bent at 90 degrees when your arms hang naturally at your sides. For most adults this is between 40 and 44 inches from the floor, but it varies by individual height and body proportions. Your monitor should be at eye level at this standing height.
How long should you stand at a riser desk each day? Research supports a sitting-to-standing ratio of one hour of standing for every one to two hours of sitting. Most ergonomics professionals recommend starting with 20 to 30 minutes of standing per hour for the first week and building gradually as your body adapts. Standing all day is not recommended and creates its own health risks.
Can I use a riser desk with a laptop? Yes. Place your laptop on the upper monitor shelf to raise the screen to eye level, and connect an external keyboard and mouse to use on the lower tray at the correct elbow height. Using a laptop directly on a riser platform without an external keyboard forces a compromise between screen height and keyboard height that negates most of the ergonomic benefit.
Do I need an anti-fatigue mat with a riser desk? An anti-fatigue mat is strongly recommended for anyone who plans to stand regularly. Standing on hard flooring without cushioning accelerates fatigue in the feet, legs, and lower back and significantly limits how long and comfortably you can stand. An anti-fatigue mat is one of the highest-impact and lowest-cost additions to a standing desk setup.
What is the weight limit for most riser desks? Weight capacity varies by model and manufacturer. Most quality desk risers support between 20 and 35 pounds. Heavy-duty models designed for multi-monitor setups can support 50 pounds or more. Always check the weight limit for your specific model, calculate the total weight of all equipment you plan to place on the platform, and maintain a reasonable safety margin below the rated maximum.
Is a riser desk as good as a full standing desk? A riser desk provides most of the same ergonomic and health benefits as a full standing desk at significantly lower cost and without replacing existing furniture. Full standing desks offer advantages in surface area, stability, cable management, and the precision and range of height adjustment. For the majority of users, a quality riser desk is an excellent and fully effective alternative to a purpose-built standing desk.
How do I stop my riser desk from wobbling? Tighten all assembly fasteners, ensure the base desk surface is level, verify the platform load is within the rated weight range, and position the riser toward the center of the desk rather than near an edge. If wobbling persists, consider upgrading to a model with a wider, more stable base footprint.
Conclusion
A riser desk has genuine, well-documented potential to reduce chronic pain, improve posture, increase daily energy, and make your workday more comfortable and sustainable. But that potential is only realized when the setup is done correctly — with precise height calibration for your specific body, proper monitor and keyboard positioning, a chair configured to complement the riser, and a sitting-to-standing routine built around the way your body actually responds rather than arbitrary standing targets.
Invest the time to get your setup right from the start. Make small, systematic adjustments as your body gives you feedback over the first few weeks. Add ergonomic accessories that address your specific comfort challenges. And approach the transition to alternating sitting and standing gradually, building the habit in a way that is sustainable for the long term.
Done correctly, a riser desk is not just a piece of office furniture. It is a daily investment in the health, energy, and physical wellbeing that allow you to do your best work for years to come.